Understanding BIP9: How Bitcoin Soft Forks Get Activated
Introduction
Bitcoin is an open-source project.
Although Bitcoin Core is written primarily in C++, there are also independent implementations of the Bitcoin protocol in other languages, such as btcd, a Go implementation.
In this article, we will use Go and btcd to explore how Bitcoin’s BIP9 mechanism activates soft forks.
Bitcoin is a decentralized network of independently operated nodes, and no central authority can force every node to run the same software or configuration. Each node operator chooses their own software and can upgrade it independently. However, not every change a node makes to its software affects the rest of the network in the same way.
A node can modify its local policies without changing the consensus rules. For example, a node could choose not to relay or accept in its mempool transactions with very low fees.
But when it comes to consensus rules, things change. Consensus rules define which transactions and blocks are considered valid by a node. For example a rule that limits the maximum size of a block is a consensus rule.
If different nodes enforce different consensus rules, they may disagree about whether a particular block is valid. One node may accept a block while another rejects it. This can lead the nodes to follow different chains, resulting in a chain split.
Bitcoin Forks
Bitcoin has two ways of changing its consensus rules: hard forks and soft forks.
A hard fork relaxes the consensus rules, meaning that it can make blocks or transactions valid that were previously considered invalid. For example, increasing the maximum allowed block size would be a hard fork.
A soft fork tightens the consensus rules, meaning that it makes the set of valid blocks and transactions more restrictive. For example, decreasing the maximum allowed block size would be a soft fork.
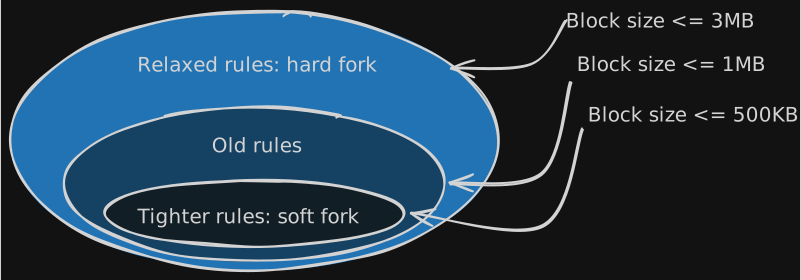
The important difference is how these changes affect nodes that have not upgraded.
With a soft fork, the new rules are more restrictive, so blocks that follow new rules are still valid according to the old rules. Therefore, nodes running the old rules can continue to accept new blocks, even though they do not enforce the new restrictions themselves. This makes a chain split unlikely – though not impossible, since a chain split can still occur temporarily if some miners keep producing blocks under the old rules.
With a hard fork, the new rules can allow blocks and transactions that are invalid according to the old nodes. As a result, nodes running the old rules will reject blocks that are valid under the new rules – making a chain split far more likely if the network isn’t fully coordinated on the upgrade.
Hard forks are outside the scope of this article. From this point on, we will focus on soft forks.
The Evolution of Soft Fork Activation
BIP30: The Flag-Day Approach
BIP30 was introduced to prevent a class of transaction duplication that could cause previously created outputs to become unspendable. The exact details of the issue are not important for this discussion. The key point is that it introduced a new consensus rule.
The basic idea behind a flag-day activation is simple: at a predetermined time, upgraded nodes start enforcing the new consensus rule.
The rule was initially applied to all blocks whose timestamp was after March 15, 2012, 00:00 UTC. It was later changed so that the rule applied to all blocks, with the exception of two historical blocks (heights 91,842 and 91,880) that had already violated it before the rule existed.
This approach has an important limitation. The activation has to be set sufficiently far in the future to give nodes enough time to upgrade, because there is no on-chain indication that a sufficient number of nodes have upgraded before the deadline. Nodes need to upgrade before the activation date, and if a significant portion of the network continues to follow the old rules, the activation can potentially lead to a chain split.
BIP16: Introducing Miner Signaling
BIP16 introduced Pay-to-Script-Hash (P2SH), a new way of locking bitcoins using the Bitcoin scripting system.
Unlike BIP30, BIP16 introduced a way for miners to signal their support for the new rules. Miners included the string /P2SH/ in the coinbase transaction of the blocks they mined.
Nodes could then observe how much hash power was signaling support for the upgrade.
To reduce the risk of a chain split, a majority of hash power needed to signal support for P2SH. The threshold was reached by checking the previous 1,000 blocks and requiring at least 550 blocks to signal support.
However, the signaling itself was not the activation mechanism. BIP16 still used a predetermined activation date. The original activation date was set for February 15, 2012, but by that date fewer than half of the last 1,000 blocks had signaled support. The date was pushed back, and on April 1, 2012, upgraded nodes began enforcing the new P2SH rules once sufficient miner support had been observed.
BIP16 therefore improved on BIP30 by adding a way to measure miner readiness before activation, but the final transition still depended on a predefined date.
BIP34: Signaling Through Block Versions
BIP34 introduced a new consensus rule that required blocks to include the block height as the first item in the coinbase transaction. By committing the block height into the coinbase transaction, it made duplicate coinbase transactions across different heights extremely unlikely, addressing the underlying transaction ID issue that motivated BIP30.
However, for the purpose of soft fork activation, the important change was not the new rule itself, but the way miners signaled support for it.
BIP34 moved miner signaling from the coinbase transaction into the block header.
Every block header already contains a version field, so instead of using an arbitrary string in the coinbase transaction like BIP16, miners signaled support for BIP34 by setting the block version to 2.
BIP34 replaced the fixed-date activation approach with a threshold-based mechanism based on miner signaling. It used a two-stage activation process.
First, when 750 out of the previous 1,000 blocks signaled version 2, upgraded nodes began requiring version 2 blocks to follow the new BIP34 rules, while still accepting version 1 blocks.
Once 950 out of the previous 1,000 blocks signaled version 2, nodes began rejecting version 1 blocks.
BIP34 improved soft fork activation by introducing miner signaling through the block version field. However, this approach has several limitations that BIP9 was designed to address. We will discuss these limitations in the next section, where we will also introduce BIP9.
BIP9: Versionbits and the Soft Fork State Machine
BIP34 Limitations and How BIP9 Addresses Them
With BIP34 the entire block version was used to signal an upgrade. This creates a problem when multiple soft forks need to be activated independently. For example:
version 2 -> CSV -> not yet activated
version 3 -> SegWit -> ready for activation
If miners set the block version to 3 to signal support for Soft Fork B, nodes cannot distinguish whether this means:
- the miner is signaling only Soft Fork B, or
- the miner is implicitly also signaling support for Soft Fork A (since version numbers are sequential and not independent)
BIP9 addresses this problem by using individual bits of the block version for different soft fork deployments. For example, one bit can signal support for Soft Fork A while another bit signals support for Soft Fork B. This allows multiple soft forks to be signaled independently.
There is another problem with the activation process. What should happen if a soft fork never receives enough miner support?
With the eariler mechanisms, there was no explicit state indicating that an activation attempt had failed. A deployment could remain in an unresolved state rather than having a clearly defined end state.
BIP9 addresses this by introducing a state machine for each soft fork deployment.
The deployment can move through different states during its lifecycle and can eventually reach either ACTIVE if the activation succeeds or FAILED if the activation conditions are not met before the timeout.
We will look at how versionbits and the state machine work in detail in the following sections.
Companion Project
This article is accompanied by a small Go project called versionbits that implements the concepts discussed throughout the article.
You can download the project and run it locally to follow the examples and see how Bitcoin’s soft fork activation mechanism works in practice.
First, make sure you have git and go installed on your computer, then clone the project and fetch its dependencies:
git clone https://github.com/soheil-stack/versionbits
cd versionbits
go mod tidy
For instructions on running the project, set the Running the Project section below.
Defining a Soft Fork Deployment
Before a node can evaluate whether a soft fork should be activated, it needs to know how that soft fork is defined.
BIP9 defines a deployment using the following parameters:
- a name to identify the deployment,
- a bit in the block version used for miner signaling,
- a start time that defines the earliest point at which miners can begin signaling support for the deployment, and
- an end time that defines when the deployment expires if it does not activate.
In our versionbits project, we represent these parameters with the following structure:
type consensusDeployment struct {
	name      string
	bitNumber uint8
	startTime time.Time
	endTime   time.Time
}
For example, our project defines the SegWit deployment as follows:
deploymentSegwit: {
		name:      "Segwit",
		bitNumber: 1,
		startTime: time.Unix(1479168000, 0), // November 15, 2016 UTC
		endTime:   time.Unix(1510704000, 0), // November 15, 2017 UTC.
}
Our project defines separate deployments for CSV, SegWit, and Taproot, each with its own signaling bit and activation window. These values correspond to the ones used on Bitcoin mainnet.
Start Time and End Time
The purpose of these timestamps is to give the network a predictable activation period.
Before the start time, nodes do not consider miner signaling for the deployment. After the start time, nodes begin counting blocks that signal support. If the deployment does not receive enough miner support before the end time, the activation attempt fails.
However, Bitcoin cannot simply compare these values against the local clock of a node or the timestamp of the latest block.
Block timestamps are provided by miners and are not a reliable source of time. A miner has some flexibility when setting the timestamp of a block, which means individual block timestamps can be inaccurate. To avoid this problem, BIP9 uses Median Time Past (MTP) instead of the timestamp of the current block.
Median Time Past is calculated from the timestamp of the current block and the 10 preceding blocks, for a total of 11 blocks. The timestamps are sorted, and the middle value is used as the effective time.
For example:
Raw timestamps:
[35, 10, 55, 20, 45, 15, 60, 30, 50, 25, 40]

Sorted:
[10, 15, 20, 25, 30, 35, 40, 45, 50, 55, 60]
                      ^
                      |
                  median = 35
The median time value is much harder for a single miner to manipulate because it depends on multiple blocks rather than a single timestamp.
Take a look at the calcMedianTimePast implementation in our project:
func calcMedianTimePast(headers []*wire.BlockHeader, height int) time.Time {
	medianTimeBlocks := 11
	timestamps := make([]int64, medianTimeBlocks)

	// number of available timestamps will be fewer than desired near the beginning of the blockchain
	i := 0
	for ; i < medianTimeBlocks && height-i >= 0; i++ {
		timestamps[i] = headers[height-i].Timestamp.Unix()
	}
	timestamps = timestamps[:i]
	sort.Sort(timeSorter(timestamps))

	medianTimstamp := timestamps[i/2]

	return time.Unix(medianTimstamp, 0)
}
The calcMedianTimePast result is used by the hasStarted and hasEnded methods:
func (d consensusDeployment) hasStarted(headers []*wire.BlockHeader, height int) bool {
	mtp := calcMedianTimePast(headers, height)

	if d.startTime.IsZero() {
		return true
	}

	return mtp.After(d.startTime) || mtp.Equal(d.startTime)
}

func (d consensusDeployment) hasEnded(headers []*wire.BlockHeader, height int) bool {
	mtp := calcMedianTimePast(headers, height)

	if d.endTime.IsZero() {
		return false
	}

	return mtp.After(d.endTime) || mtp.Equal(d.endTime)
}
These methods are used during deployment state transitions, which we will cover shortly.
Version Bits: Signaling Support For a Deployment
Every Bitcoin block header contains a 32-bit version field. Instead of assigning a different version number to every soft fork, BIP9 uses individual bits inside the field.
Each deployment is assigned a specific bit. A miner signals support for a deployment by setting that bit to 1 in the block header.
This allows multiple soft forks to be signaled independently.
For example:
Version:

bit 0 = 1  -> signal support for CSV
bit 1 = 1  -> signal support for SegWit
bit 2 = 0  -> no support for Taproot
To distinguish BIP9 signaling from other uses of the version field, BIP9 requires the first three most significant bits of the version field to be 001.
This marker matters because earlier soft forks (like BIP34) used the version field directly as a small integer – 1, 2, 3, 4 – all of which have zero in their top three bits.
A version beginning with 001 can never be confused with one of these older, pre-BIP9 block versions.
The block version format is:
31  29 28                        0
+----+---------------------------+
|001 |       version bits        |
+----+---------------------------+

 ^                ^
 |                |
 |                +-- 29 deployment bits
 |
 +-- BIP9 identifier
The remaining 29 bits, numbered 0 through 28, are available for signaling individual soft fork deployments.
The complete signaling check in our project is:
func checkDeploymentCondition(header *wire.BlockHeader, deployment consensusDeployment) bool {
	vbTopBits := uint32(0x20_00_00_00)
	vbTopMask := uint32(0xe0_00_00_00)

	conditionMask := uint32(1) << deployment.bitNumber
	version := uint32(header.Version)

	return (version&vbTopMask == vbTopBits) && (version&conditionMask != 0)
}
The version bits are not permanently assigned to a specific deployment. However, a bit should only be reused if the new deployment starts after the previous deployment has either been activated or has reached its timeout (end time). Although bits can be reused, this is usually avoided because it can make different deployments that use the same bit harder to distinguish.
The BIP9 State Machine
At this point, we have all the pieces needed to understand how a node evaluates a BIP9 deployment:
- a deployment has a start time and an end time,
- miners signal support using a specific version bit, and
- nodes use Median Time Past to determine whether the deployment has started or expired.
The remaining question is how these pieces are combined to determine the current state of the deployment.
BIP9 defines a state machine for this purpose. A deployment moves through a sequence of states during its lifecycle:
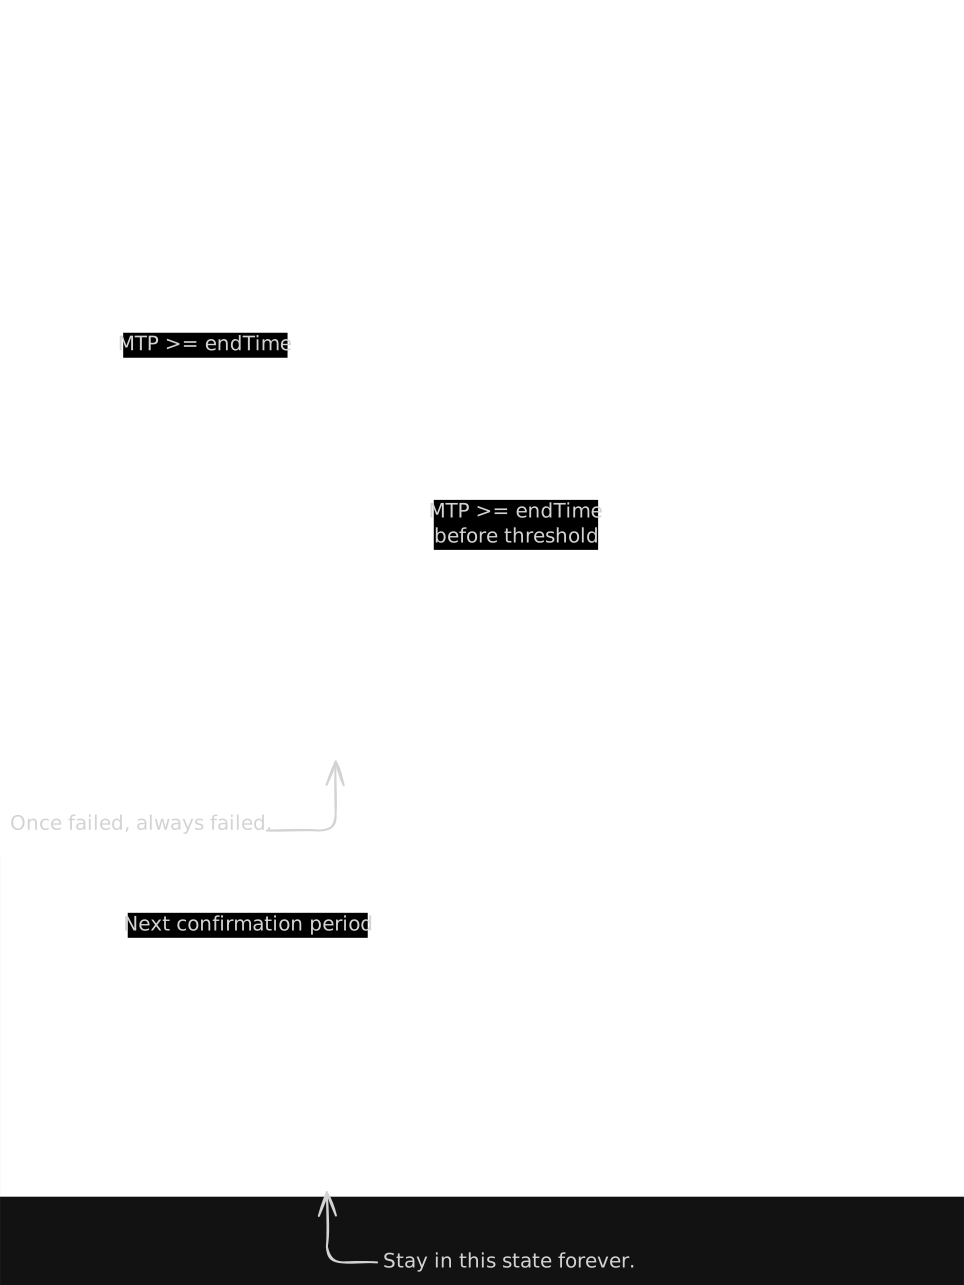
There are five possible states:
DEFINED– the deployment has not started yet.STARTED– the deployment has begun, and nodes are counting miner signaling.LOCKED_IN– enough miners have signaled support, so the deployment is guaranted to activate.ACTIVE– the new consensus rules are being enforced.FAILED– the deployment reached its end time without receiving enough support.
A deployment starts in the DEFINED state. Once its start time is reached, it moves to STARTED.
During this state, nodes examine the blocks in each confirmation window and count how many signal support for the deployment.
On Bitcoin mainnet, a confirmation window contains 2,016 blocks, and at least 1,916 blocks must signal support for the deployment.
These values are provided by btcd’s mainnet parameters and used in our project:
var minerConfirmationwindow = int(chaincfg.MainNetParams.MinerConfirmationWindow) // 2016
var ruleChangeActivationThreshold = int(chaincfg.MainNetParams.RuleChangeActivationThreshold) // 1916
If the number of signaling blocks reaches the required threshold, the deployment moves to LOCKED_IN.
At this point, activation is guaranteed, but the new rules are not enforced yet.
After one additional confirmation window, the deployment becomes ACTIVE.
This delay exists to give node operators and miners who haven’t yet upgraded time to do so – since once a deployment is LOCKED_IN, activation is guaranteed, so the network has a fixed, predictable window to prepare before the new rules are actually enforced.
If the deployment reaches its end time before the signaling threshold is reached, it moves to FAILED instead.
A failed deployment does not become active.
Our project represents these states using the thresholdState type:
type thresholdState uint8

const (
	thresholdDefined thresholdState = iota
	thresholdStarted
	thresholdLockedIn
	thresholdActive
	thresholdFailed
)
The state transition logic is implemented by the thresholdStateTransition function.
func thresholdStateTransition(headers []*wire.BlockHeader, height int, deployment consensusDeployment, state thresholdState) thresholdState {
	switch state {
	case thresholdDefined:
		if deployment.hasEnded(headers, height) {
			return thresholdFailed
		}
		if deployment.hasStarted(headers, height) {
			return thresholdStarted
		}
		return thresholdDefined

	case thresholdStarted:
		if deployment.hasEnded(headers, height) {
			return thresholdFailed
		}

		var countNode *wire.BlockHeader
		count := 0
		for i := range minerConfirmationwindow {
			countNode = headers[height-i]
			if checkDeploymentCondition(countNode, deployment) {
				count += 1
			}
		}

		if count >= ruleChangeActivationThreshold {
			return thresholdLockedIn
		}

		return thresholdStarted

	case thresholdLockedIn:
		return thresholdActive
	case thresholdActive:
		return thresholdActive
	case thresholdFailed:
		return thresholdFailed
	default:
		panic("unreachable")
	}
}
The important point is that thresholdStateTransition does not calculate the enitre deployment history.
It only answers one question:
Given the previous state, what should the state of the current confirmation window be?
We will next see how a node determines the state of a deployment at a specific block height by recursively evaluating previous confirmation windows in the deploymentState function.
Calculating the Deployment State
So far, we have looked at how a deployment moves from one state to another. The remaining question is how a node determines the state of a deployment at a particular block height.
Our project handles this with the deploymentState function.
func deploymentState(headers []*wire.BlockHeader, height int, deployment consensusDeployment, cache thresholdStateCache) thresholdState {
	if height%minerConfirmationwindow != 0 {
		height -= height % minerConfirmationwindow
	}

	if height == 0 {
		return thresholdDefined
	}

	blockHash := Hash(headers[height].BlockHash())

	state, ok := cache[blockHash]
	if !ok {
		state = deploymentState(headers, height-minerConfirmationwindow, deployment, cache)
		state = thresholdStateTransition(headers, height, deployment, state)
		cache[blockHash] = state
	}

	return state
}
The deployment state is evaluated at confirmation-window boundaries. If the requested height is not at a boundary, it is moved back to the nearest one.
if height%minerConfirmationwindow != 0 {
	height -= height % minerConfirmationwindow
}
By definition, the genesis block has the DEFINED state for every deployment.
if height == 0 {
	return thresholdDefined
}
The function then checks whether the state for that block has already been calculated and stored in the cache.
If it has not, the function recursively calculates the state of the previous confirmation window:
state = deploymentState(headers, height-minerConfirmationwindow, deployment, cache)
Once the previous state is known, thresholdStateTransition determines the state of the current window:
state = thresholdStateTransition(headers, height, deployment, state)
The result is then stored in the cache:
cache[blockHash] = state
The recursive approach allows the state of each confirmation window to be derived from the state of the previous one. The cache then prevents the same windows from being evaluated repeatedly.
Constructing Block versions
So far, we have looked at how nodes interpret version bits in existing blocks. It is also useful to see how btcd sets the version field when creating a new block.
The implementation can be found in blockchain/versionbits.go in the calcNextBlockVersion function. A simplified version of the function is:
func calcNextBlockVersion(...) int32 {
	vbTopBits := uint32(0x20_00_00_00)
	expectedVersion := vbTopBits

	for _, deployment := range deployments {
		state := deploymentState(deployment)

		if state == ThresholdStarted || state == ThresholdLockedIn {
			expectedVersion |= uint32(1) << deployment.BitNumber
		}
	}
	return int32(expectedVersion)
}
btcd only sets a deployment’s signaling bit while the deployment is in the STARTED or LOCKED_IN state.
Once a deployment becomes ACTIVE or FAILED, its signaling bit is no longer included in new block versions.
Therefore, when no deployment activation is currently in progress, btcd creates blocks with only the BIP9 version prefix 0x20000000.
Running the Project
Now that we have covered how BIP9 works and how it is implemented in our project, let’s run the project and see the deployment states in practice.
Since this project is intended as a companion to the article rather than a production ready Bitcoin node, some values have been hardcoded to make it easier to experiment with the code.
For example, the project contains the following configuration:
const	peerAddress              = "119.196.44.37:8333"
const downloadHeaders          = true
The peerAddress must point to a reachable Bitcoin mainnet peer.
The downloadHeaders option controls whether the project synchronizes block headers.
The first time you run the project, set it to true.
The first run can take some time because the project needs to download the block headers from genesis to the current tip. At the time of writing, the headers are around 80 MB.
After the initial synchronization, you can set downloadHeaders to false. If you leave it set to true on subsequent runs, the project will only download the new block headers since the last synchronization.
Here is an example output from running the project:
> go run .
2026/08/12 17:49:41 connecting to 119.196.44.37:8333
2026/08/12 17:49:41 -> version
2026/08/12 17:49:42 <- version
2026/08/12 17:49:42 received unknown message
2026/08/12 17:49:42 <- verack
2026/08/12 17:49:42 -> getheaders
2026/08/12 17:49:42 received unknown message
2026/08/12 17:49:42 <- ping
2026/08/12 17:49:42 -> pong
2026/08/12 17:49:42 <- headers (3)
2026/08/12 17:49:42 header synchronization complete
2026/08/12 17:49:42 loading headers from data/headers.dat
2026/08/12 17:49:45 loaded 962154 headers
2026/08/12 17:49:45 loading deployment caches from data/deployment.cache
2026/08/12 17:49:45 loaded deployment caches
2026/08/12 17:49:45 evaluating deployment states at height 962153
2026/08/12 17:49:45 CSV      -> ThresholdActive
2026/08/12 17:49:45 Segwit   -> ThresholdActive
2026/08/12 17:49:45 Taproot  -> ThresholdActive
2026/08/12 17:49:45 write deployment caches to data/deployment.cache
The project connects to the Bitcoin peer, performs the header synchronization, loads the previously calculated deployment states and block headers, and then evaluates the deployment states at the latest available height.
In this example, all three deployments – CSV, SegWit, and Taproot – are in the ACTIVE state.
Conclusion
Bitcoin upgrades require coordination between thousands of independent nodes. Since there is no central authority that can force nodes to upgrade, soft forks need a mechanism that allows participants to coordinate the adoption of new consensus rules.
In this article, we explored how Bitcoin uses BIP9 to activate soft forks.
We looked at how deployments are defined, how miners signal support using version bits, and how nodes use the BIP9 state machine to move deployments from DEFINED to ACTIVE.
BIP9 provides a predictable and transparent activation process, but it also has limitations. Since activation depends on miner signaling, miners can delay a deployment by not signaling support. For example, when a high activation threshold is used, a minority of hash power can prevent activation even if the majority supports the change.
These limitations led to alternative activation approaches, such as User Activated Soft Forks (UASF), where economic nodes coordinate enforcement of new rules independently of miner signaling. UASF is outside the scope of this article, but it’s worth exploring if you want to see how this limitation played out in practice.
I hope this article helped you better understand how Bitcoin soft fork activation works and gave you a clearer view of the mechanisms that allow a decentralized network to evolve without a central authority.